The Best and Worst Free Stuff
In our first ever live stream using free OBS software, we discuss the best and worst free items we’ve received for review. We also explain why we stopped doing video reviews for low cost sample freebies.
You can't beat FREE!™

In our first ever live stream using free OBS software, we discuss the best and worst free items we’ve received for review. We also explain why we stopped doing video reviews for low cost sample freebies.
It’s that time of year again! Time for our favorite annual freebie event, Free Comic Book Day! We’ve talked about it on the podcast. We’ve blogged about it on the site. This year we made a video! In our Free Comic Book Day video review we tell you what it’s all about, show you what it’s like and give you some tips on how to make the most of this exciting event. It’s a great day out for the entire family.
Free Comic Book Day is a annual event held at participating comic book stores nationwide on the first Saturday of May. This year FCBD will be held May 6, 2017. If you like comic books, and you like free stuff, you’ll love this! For more information and to find a list of the comics available for free this year, visit www.freecomicbookday.com.
If you like this video, please subscribe to our YouTube channel. Comments? Questions? What products would you like us to review? Tell us in the comments below. We read them all.
We received this one free in exchange for our honest evaluation. In this video, we open up the box, show you what is in it, test it out on Tommy’s dog Cosmo, and tell you what we think. if you liked watching Cosmo in the Bil-JacSuper Premium Dog Food video, you’ll get to watch a lot more of him in this one.
If you like this video, please subscribe to our YouTube channel. Comments? Questions? What products would you like us to review? Tell us in the comments below. We read them all.

There is an enormous array of products on the market to train your dog into full subservience. From simple leashes to elaborate electronic pet fences, there seems to be an endless choice of options of gizmos and gadgets available to properly train your pup. Now there is one more, the Cujo Control CC-810 Remote Training Collar. When we received one free in exchange for an honest review, we gave it a try. Well actually, we tried it on the dog.
Cujo Control is based in Roseland, New Jersey. The company currently offers two dog training products, a “no bark” collar and a dog training collar with remote. The CC-810 is the latest version of the training collar and it is the product we received for the review.
The CC-810 is a dog obedience training device capable of delivering three types of disciplinary actions, including a high pitched auditory tone the dog can hear, a vibrating action the dog can feel, and a “stimulation” the dog can feel, or more precisely, an electric shock. According to the company, it’s a “safe but annoying” stimulation, and is “proven safe”.

The CC-810 consists of three primary components:
The collar is designed to accommodate dogs of almost any size, from small to large. The receiver unit attaches to the collar and against the underside of the dog’s neck. The receiver has two metal contact points. These contact points rest directly on the skin of the neck.
The receiver is controlled by the remote radio transmitter, which looks and feels like a small two way radio without the mic and speaker. According to the specs, it has a range of up to 300 meters, or about 984 feet. The transmitter can control up to two dogs with receivers (the additional receiver is purchased separately). It is equipped with a small blue backlit LCD display and a set of buttons to control the tone and type and intensity of the vibration or “stimulation”. The CC810 allows up to 16 levels of shock and vibration. When activated by the transmitter, the receiver delivers the appropriate response for as long as the particular button is pressed, up to a maximum of 10 seconds.
Both the transmitter and receiver operate on two AAA alkaline batteries. Four batteries are included in the kit, two for each device.
The CC810 includes a 31 page Operating and Training Guide. It is fairly thorough, with important safety information and warnings, assembly instructions, and step-by-step training procedures with helpful tips. It is, however, riddled with typographical errors.
We tested the CC-810 on Tommy’s dog, Cosmo. the results were, well, interesting.
Now, Cosmo is already a fairly well-behaved dog. We wouldn’t say he is fully trained in all areas of obedience, but he does understand a number of commands, and will usually respond to them as long as he isn’t too distracted. However, he is still learning, and he could always use more obedience training, and he was the only dog available, so he was the prime candidate to test out the CC-810.
First, Tommy assembled the CC-810 collar and receiver unit according to the instructions printed in the manual. He did this on camera for the CC-810 video review. The kit contained everything he needed for assembly, including the batteries (which seems to be the new normal for battery operated electronics these days). The manual was easy to read, but riddled with typos. Fortunately, assembly was simple and straightforward, so it wasn’t a big deal.

We put the collar on Cosmo, and took him outside to test it out. The manual suggested we start at the lowest level and work up to find his level of tolerance to the vibration and shock. There was no reaction at level one, but he began to respond to the vibration around level 4 and the “stimulation” (shock) at level 5, so we kept it there for awhile.
Following instructions in the manual, we first tested the tone on the dog. He could hear it, and the first time we used it, he did respond, but after that, he ignored it.
Next we tried using the vibration function. The first time it startled him. We tried it a few more times and Cosmo responded to our commands. Each time we used it with a command, he was rewarded with a treat. After several of these, he became used to the vibration and began to ignore us. Tommy raised it to level 6, he began to respond to our commands again.
Then Tommy tried the stimulation, or as I now call it, the zapper. Cosmo didn’t like it at all. After a zap or two at level 5 (the minimum threshold we initially set), it clearly upset him, so we didn’t use it again and stayed with the vibration instead.
The manual includes step-by-step procedures for using the collar to train a dog to come. We performed a variation of this one without a leash, using vibration and the word here. Since Cosmo already knew this one, he quickly made the connection and understood what we wanted him to do. The manual also included instructions to teach certain commands as well as deter or control several behaviours, none of which we tried, simply because after few tests with the command here, we felt Cosmo had already endured enough.
After removing the receiver collar from Cosmo, Tommy and I decided to check the stimulation for ourselves. We took turns placing the tips of our fingers on the contact points and pressed the button on the transmitter. Neither of us felt anything at levels one and two, and although I still detected nothing at level 3, Tommy did feel a slight tingle.
Then we both tried level 6.
The receiver delivered a strong electric jolt. It reminded me of a medical TENS unit that was set a little too high.
We decided not to take it to level 16.

To summarize, The Cujo Control Remote Training Collar is best suited for young, healthy dogs with little or no previous obedience training. The transmitter is simple to use and works well in close range. The company claims a maximum range of 300 meters, however we didn’t test the coverage. There were no specs available for the radio, and there was no FCC ID on the device, so we were unable to determine its frequency band or wattage. Range depends on a number of variables, including terrain, nearby obstructions, interference, atmospheric conditions, and the quality of the antenna. As licensed ham radio operators, we can say that your range may vary greatly.
The receiver is a bit of a mix. Like the transmitter, it is simple to operate. The trick is to be sure it is attached to the collar, positioned on the dog’s neck and operated correctly. The kit we received included two pairs of contact points for the receiver, one longer than the other. We didn’t know which set to use, and it wasn’t explained or even noted in the manual, so we chose the shorter pair, based on the fact that Cosmo is a small dog.
The tone function is not very loud. Perhaps it doesn’t need to be, since the receiver is mere inches from the dog’s ears, and dogs do hear well. The vibration function is quite robust, and at higher levels can even be heard. As for the stimulation function (the zapper), while somewhat mild at very low settings, it is capable of delivering a surprisingly strong shock at higher settings. Although Cujo Control claims the device is safe, I have some reservations, especially if this feature is used carelessly or abused. Tommy and I each experienced an uncomfortable jolt at level 6, and that was on the low end of 16 settings! It may be needed for larger dogs, but for some smaller canines like Cosmo, I think the vibration function is probably sufficient for training.
The bottom line: The Cujo Control Remote Training Collar is not a toy, it is a serious training device and should be used responsibly. Used improperly or abused, it could make your dog frustrated, distrustful of you or even angry. It could possibly even hurt your pet. However, in the right hands, with the right instruction, and used judiciously, it can be an efficient and effective dog obedience training tool.
Disclaimer: I received this product free in exchange for my unbiased review. The opinions are my own.
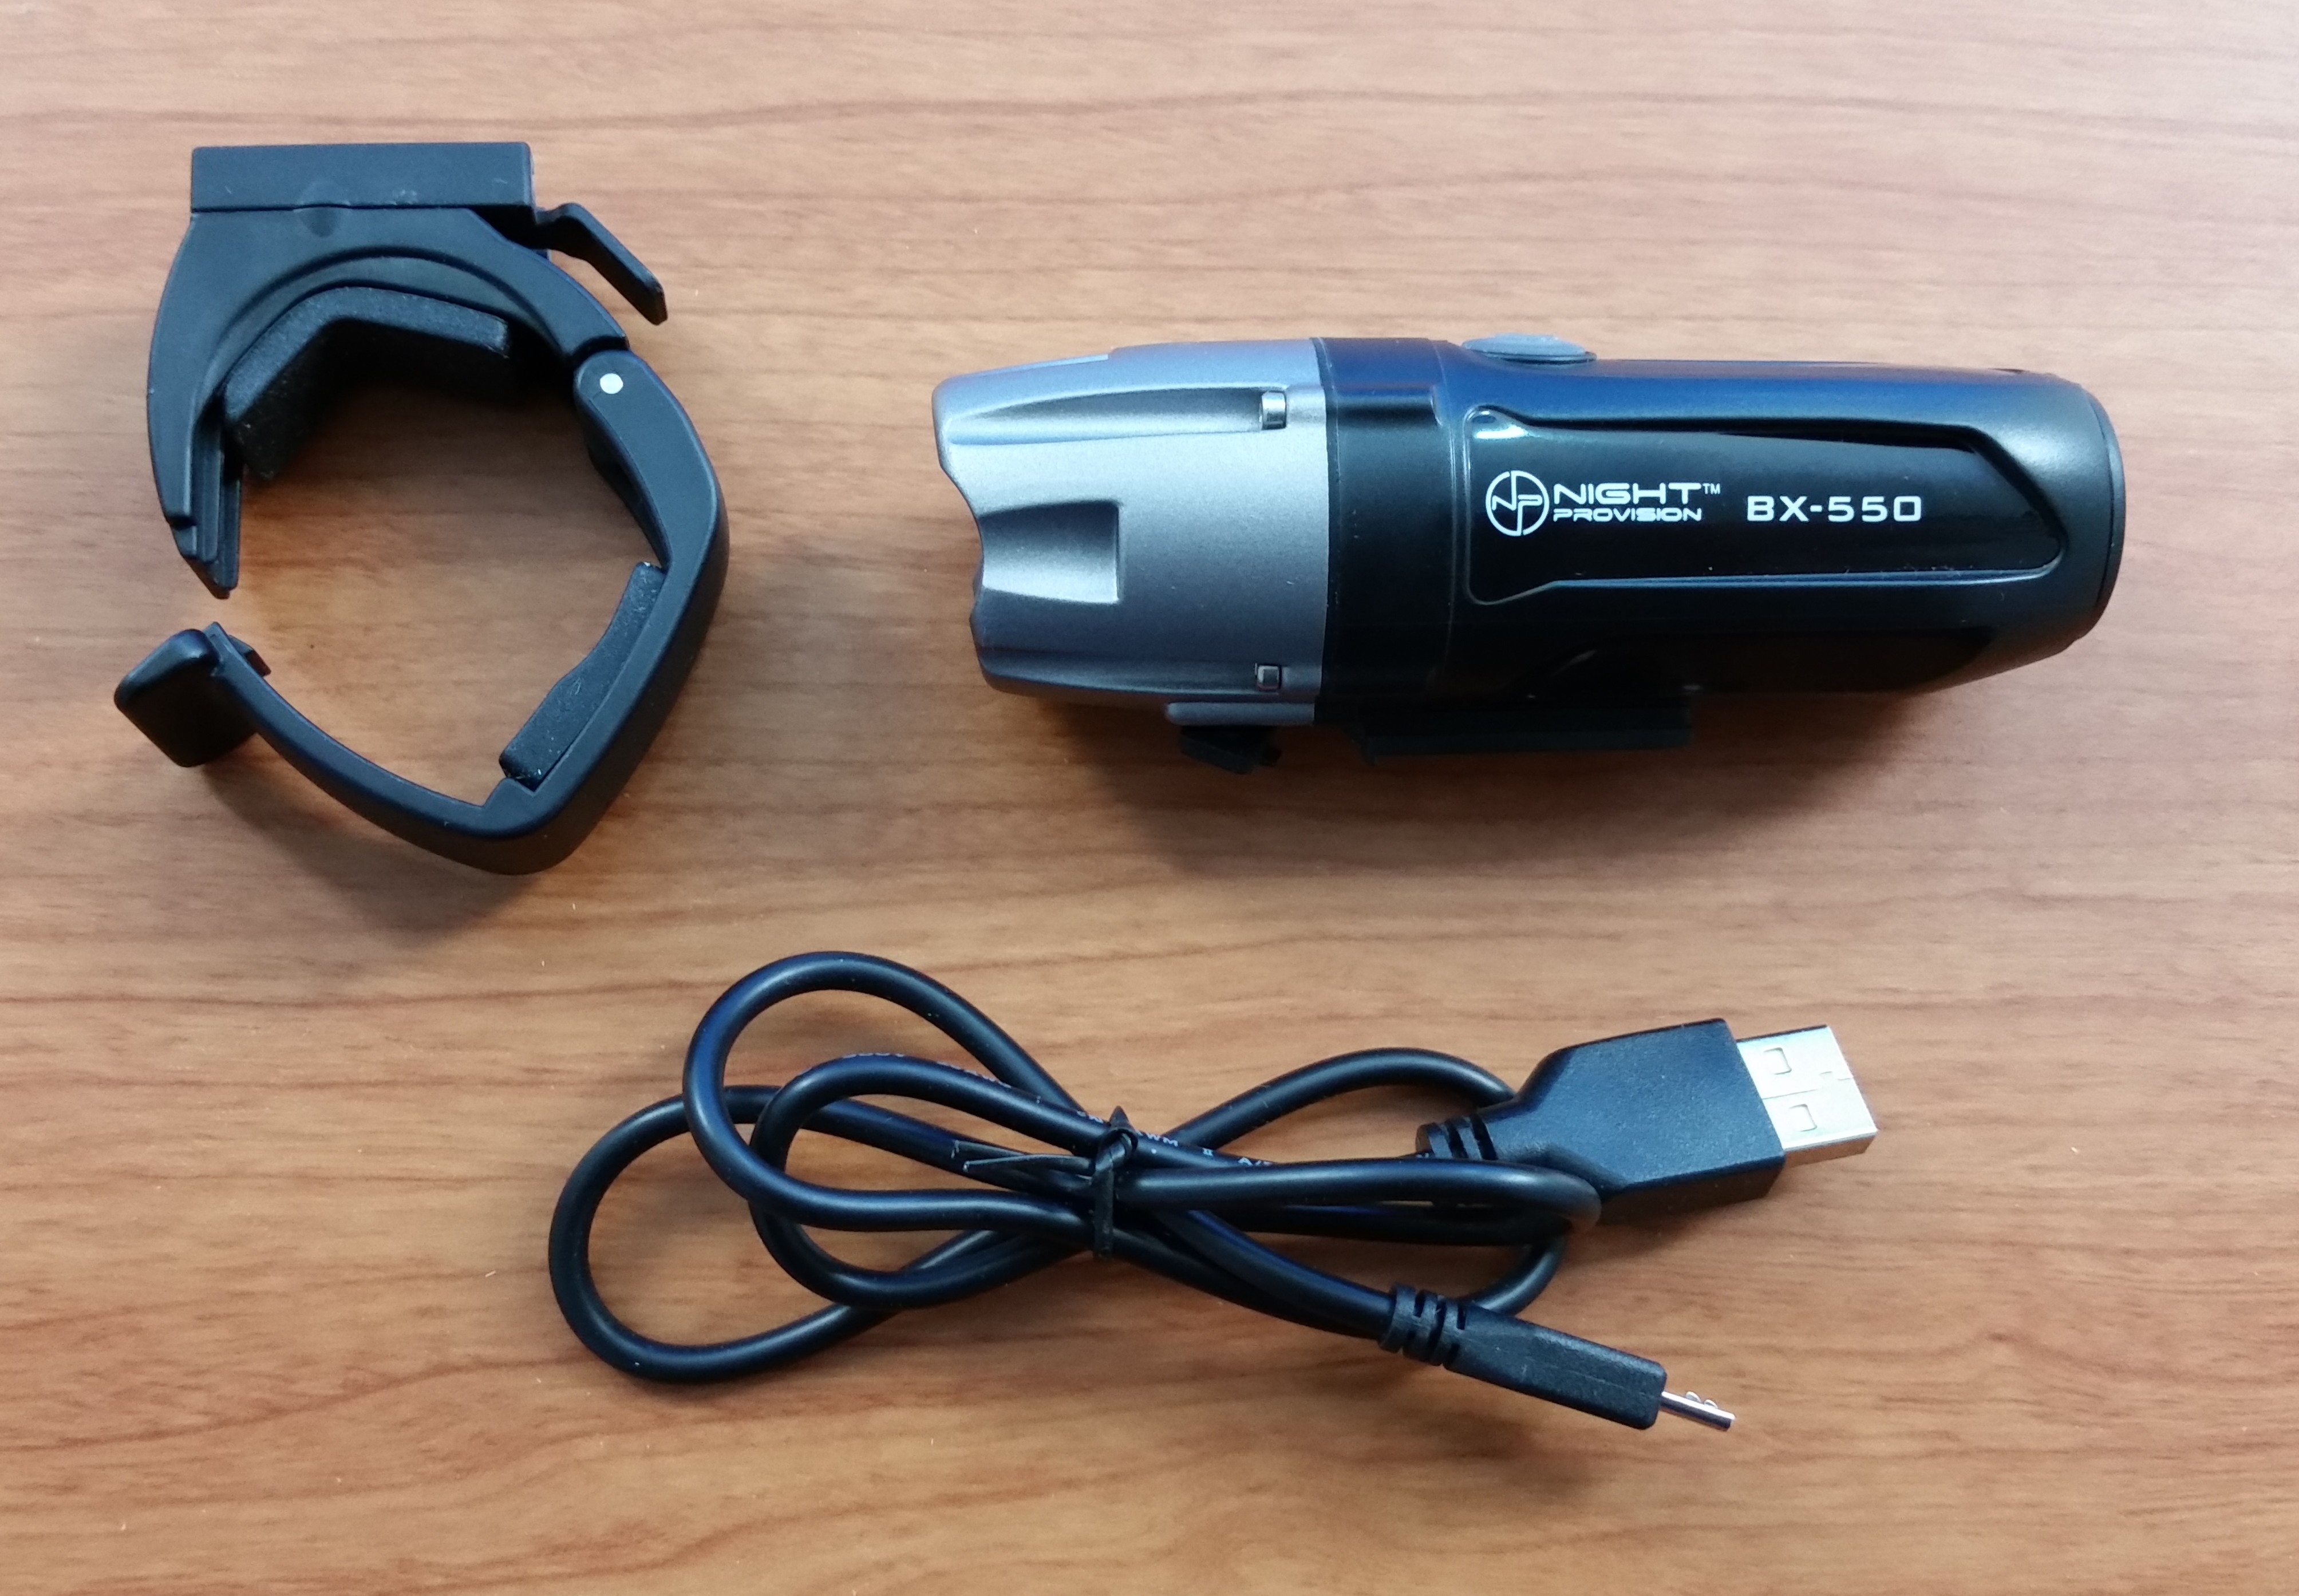
I used to ride my bicycle a lot. During the last few years, day-to-day activities took over and I slacked off on pedaling outdoors. One reason for this is because my bike was not equipped for riding any time after the daylight hours. That just changed with the arrival of the BX-550 USB Bike Headlight from Night Provision. I received one free in exchange for an honest review, and now I have no excuse not to hop back on and pedal around the neighborhood at dusk to try it out. So, is it any good? Here is my Night Provision BX-550 USB Bike Headlight review.
Night Vision makes LED lights, including tactical flashlights and bike lights. This model is the BX-550, a USB rechargeable bicycle headlight equipped with a CREE® XML2 T6 LED capable of up to 550 lumens. It’s made of anodized 6061 aircraft aluminum alloy with ABS plastic and is rated IP65 water resistant. It is powered by a rechargeable Lithium-ion battery pack and has an detachable mount for easy attachment and detachment when mounted on the front handlebar of just about any bicycle on the market.
Not surprisingly, the BX-550 installs as advertised. The Easy-Click mount clamps to the handlebar of the bicycle with a locking lever that allow you to adjust and tighten the grip as needed for a firm hold. The bike light itself easily slides onto the mount and locks in place with a plastic tab. To detach the light, simply press the locking tab to release and slide the light off the mount, then pull the locking tab lever to release the clamp from the handlebar.
The only thing I didn’t like about the Easy-Click mount was the ease with which the plastic tab released the light from the mount. It was too easy. Also, when placing the light onto the mount, it didn’t just slide on and automatically click into place. I had to consciously remember to push up on the plastic tab to lock the light onto the mount. If I didn’t, the light would slide right off again.

The bike light itself is powerful and works well. It has four modes of operation controlled by a button on the top. The first press turns on the light in High mode with a full 550 lumens. A second press places it in Medium mode with 250 lumens. The third press puts it into low mode with 50 lumens. Pressing it a fourth time takes the light into Flash or Strobe mode at a medium brightness of 250 lumens. A press and hold for several seconds turns it off.
As with the mount, the light itself worked as advertised. At full illumination it is very bright, and has a wide area of coverage. According to the manual, the light will operate for up to three hours at high mode and ten hours in low mode, presumably on a full charge. I haven’t tested that out, since my night rides would not usually exceed 30 minutes, but it’s a good reason to keep the BX-550 charged up in case the extra time is needed.
Which brings us to the battery and the charging capabilities of the light. The BX-550 is powered by a 2400 mAh lithium-ion battery, which is easily removable if it needs replacement. The light has a built-in micro-USB port for charging with a computer or portable power bank equipped with USB. The power button on top of the light is also a multi-color status light. It glows red when the battery is depleted or while the light is charging and blue when fully charged or when the light is on in any of the its operating modes. Charge time varies depending on the state of the battery, but my first time charging completed in less than an hour.
As for weather resistance, the BX-55 seems durable enough. The IP65 rating means that it has full protection from ingress of dust or a spray of water projected by a nozzle 6.5mm or less. In other words, it’s dust proof and water resistant, but not waterproof. Since I don’t usually ride my bike during inclement weather, I can’t fairly review it’s resiliency to the elements based on my own experience, so I’ll have to defer to the Ingress Protection rating. It may survive a ride in a rainstorm, but don’t drop it in a puddle of water.
I do have one concern. After a few minutes in high mode, the head of the flashlight becomes fairly hot. I don’t think it gets hot enough to burn the skin, but it is a lot warmer than I expected. When using this light, be sure to give it a few seconds to cool down before you detach it from the mount.
Overall, the Night Provision BX-550 USB Bike Headlight is a nice little light for cycling. It’s small, but powerful and provides sufficient light for a little biking around after dark or just before dawn. It’s easy to mount, easy to use and easy to recharge. As long as you remember to push up on the lock tab and you remember to recharge it after use, it’s a handy little accessory for any cyclist who likes or needs to ride at night. #BX550
Disclaimer: Disclaimer: I received this product free in exchange for my unbiased review. The opinions are my own.

The shaker itself seems a lighter and thinner steel than it probably should be, so the exterior will become cold quickly if you add a lot of ice. The top cover is a bit cumbersome to secure over the shaker, and once you get it on, it can pop off without much effort. The top cap fits over the strainer a little better, but is also easy to remove, so you will need to be careful and hold the strainer cap and top cover securely assembly securely before shaking to keep the drink from leaking through the top of the strainer or entire assembly from coming apart while shaking. It isn’t difficult to keep it all together, but it does not seem to be designed for too vigorous a shaking.
The pourers seem to fit bottles well and they seem to work just fine. I was somewhat surprised with the double jigger, though. It is advertised as a 1/2 oz shot on one side and 1 ounce on the other, but there are no markings on the jigger to indicate where these levels are. Do you fill it to the brim, or a some reasonable point below? Without an accurate level of measurement etched or marked somewhere on the jigger, there’s no way to know for sure if you are really pouring the appropriate amount of liquid into it or not.
The branded velvet storage bag is a nice touch, and the drawstring adds a little class, but considering how thin the shaker assembly is, the fancy bag may be a little too classy for this set. I wouldn’t call this a heavy duty shaker, because it isn’t, but for occasional light duty use at home it should do the job. nevertheless, the storage bag overhypes the contents inside it.
This shaker kit includes one more item, an ebook called 100 Recipes For Cocktails. Well, it’s not exactly an ebook. It’s just a flyer with information on how to redeem the free ebook online. However, to redeem the item, you first register on the ShikShook web site as a “VIP member” to access or download it, and since I didn’t want to risk exposing my e-mail address to one more mailing list, I declined the offer. It’s probably a good source of drink recipes, and it is part of the package, but as I already have too many sites to log into, too many passwords to remember and my mailbox already gets bombarded with stuff I don’t read, I passed on it. If you decide to purchase the cocktail shaker set and need an ebook of cocktail recipes, as long as it’s part of the package I’d say give it a try.
I would not call the ShikShook Cocktail Shaker Set professional grade or a premium product, but if you like a cocktail every once in a while, it’s not a bad set for the price. Just don’t forget to keep a hand firmly over the top of it before you shake.
The ShikShook Cocktail Shaker Set is available at Amazon.com.
Disclaimer: I received this product free in exchange for my unbiased review. The opinions are my own.

I’ve been interested in the concept of investing for quite a while now, and am still researching all the possible opportunities to grow personal wealth. Earlier this year I considered the prospects of investing a small amount of my income in penny stocks. Thinking this would be an easy, inexpensive way to dabble in the stock market without risking huge sums of money that I didn’t have, I set up an account with an online brokerage and began the process of searching for companies in which to invest.
However, as I began to research the penny stock landscape, I got cold feet. The more I read about it, the more cautious I became. After a few weeks, I realized that I didn’t know enough about penny stocks to feel comfortable enough to dive in, so I backed out of the idea entirely and without investing a single penny. I’m glad I waited.
Recently I received an invitation to review an audio book called Penny Stock Trading & Options – Trading QuickStart Guides: The Simplified Beginner Guides to Penny Stock Trading & Options Trading. Published by ClydeBank Media and available at Audible.com, this audio publication is a primer for the beginning investor who is interested in dipping a toe in the penny stock and stock options markets. Actually, it isn’t one audio book, but two, offered together in one convenient bundle for $14.95. I received a copy of this audio book free in exchange for my honest review. As it turns out, it was just what I needed.
Narrated by Peter Bierma, The Penny Stock Trading Quick Guide is a no-nonsense, easy to understand beginner’s introduction to the world of penny stocks, and in some aspects, the stock market as a whole. The first chapter starts off with the basics of stock trading, and I mean the basics, such as what stocks are, what a stock market is and how stocks are traded. From there it dives right into the specific area of penny stocks with a fast but surprisingly thorough set of tutorials. These lessons covered the risks involved, the metrics and formulas to learn and use when researching the performance of the stocks and companies in which you want to invest, and the pitfalls to watch for when trading. The audio book also warns about the many scams that permeate the penny stock marketplace.
I had already done some research into the topic, so the first few chapters were somewhat rudimentary for me. I was also aware of some of the more well-known scams, such as the pump-and-dump schemes. However, the metrics, formulas and ratio calculations were quite helpful. These were the tools I did not have on my first visit to penny stocks. I now have something to work with, a renewed interest in the penny stock arena and a little more confidence in the world of investing.
The second title in the audio book bundle, Options Trading, was a bit more awkward to get through. Also narrated by Peter Bierma, this one dealt with stock options, something I’ve heard a lot of but knew little about. It is clear this one is also written for beginners, but it also tackles an area of the stock market that is more complicated to navigate and understand than simply trading the stocks themselves. I slogged through it, and I learned a lot more from this one, but I was still left somewhat confused. To be fair, my interest in the stock market doesn’t include the specific area of stock and commodity options trading, so I’ll admit I got lost a few times. I do know that knowledge is power. The more I know about how the stock market works, the greater the chances of success with it, so I listened.
In short, Options Trading does a good job of explaining what I consider a more convoluted area of the stock market in relatively simple terms. Had it been a dryly written paperback, I would have dozed off after page 1, but it wasn’t. I can’t say that it was more interesting as an audio book, but it kept the explanations simple with enough real world analogies and examples to keep me from getting totally lost. The only downside to Options Trading is that the topic itself doesn’t work well in an audio book format without a visual element to accompany it. Some of the concepts can be difficult to grasp without a chart, graph or some other illustration to more effectively explain them. Fortunately, this package has it covered.
The audio book bundle includes a supplemental in the form of the Audiobook Companion PDF, a document in pdf format with all the charts, graphs, tables and formulas referenced in both Quick Guides. Although touted in the audio book as helpful but not necessary, the supplement is indeed important, especially when listening to the second audio book.
The pdf file isn’t bundled directly with the audio book. It needs to be downloaded separately, and the audio book includes instructions at the beginning on how to do so. Do this before you get too far into the books. Trust me, you’ll need it.
There is one issue with the audio book bundle. Each illustration in the companion pdf is labled figure 1, figure 2, etc. and the narrator refers the listener to them as the book progresses. The Options Trading book and companion are not in sync from illustrations 24 to the end of the companion. For instance, when the narrator says “please refer to figure 24 in the companion pdf”, the correct reference is figure 28. It isn’t a deal breaker, but makes an already challenging topic to grasp all the more confusing.
In summary, Penny Stock Trading & Options – Trading QuickStart Guides: The Simplified Beginner Guides to Penny Stock Trading & Options Trading is a recommended listen for anyone who wants to get into the stock market for the first time. It’s relatively easy to understand and easy to listen to, even when you are on the go. It also contains some good advice, without being preachy. Before you spend a penny on penny stocks, you may want to consider this audio book. It may save you much more.
Full Disclosure: I received this book for free in exchange for my honest and unbiased review.

Some things are never really appreciated until they are absolutely needed, and when they are needed, they can be indispensable. Take flashlights, for instance. Years ago, I never thought much about having a flashlight until there was a power outage, or I was stuck on the side of the road changing a tire late at night. When something like that happened, a flashlight was the first thing on my mind. Today, however, I like to be prepared for such emergencies. So when I had the opportunity to receive a free AYL TC-80 4-in-1 LED Flashlight in exchange for a review, I saw a light, so to speak.
The AYL TC-80 is an LED flashlight that can also convert into a small lantern or a flashing emergency beacon of sorts. It is sold by a company called Accessorize Your Life, which apparently is what the acronym AYL stands for. The company sells an assortment of tech related products, including cases and sleeves for smartphones and tablets, wireless mini speakers, and of course the TC-80.
AYL promotes the TC-80 as a “Tactical Emergency Nightlight with Telescoping Body and Magnetized Base – Water Resistant Spotlight for Work, Auto, Camping, Garage, Emergency – Battery Powered”. The flashlight is equipped with Cree® LED’s. Cree is a well known and respected manufacturer of LED lighting components, and a flashlight manufactured with a CREE branded LED is usually considered higher end.
The flashlight arrived packaged in a plain small brown cardboard box with no fancy labeling, graphics or frills. It was a very unassuming package indeed, and gave no hint of anything particularly special inside.
Then I opened the box. The moment I took the TC-80 out of its bubble wrapped sleeve, I was somewhat impressed. I saw photos of it online, so it was about what I expected as far as looks were concerned. However, it had some real weight and felt solid and durable. It was what I hoped for, and what I expected, but the reason it impressed me was because I wasn’t disappointed. It met my expectations.
The TC-80 takes 4 AAA batteries, and does not include them, so I had to shop for a pack before I could test the flashlight. (Most of my devices use AA batteries or rechargeable battery packs, so I didn’t usually keep the little AAA cells handy.) Once the batteries were inserted, things really lit up – literally.
The front beam consists of a CREE XP-E R3 Ultra Bright LED with a telescopic lens assembly capable of instantly adjusting from a narrow focused beam up to an almost 180 degree spread. The beam is very bright – the first time I turned it on it really lit up the room. The narrowest focus is so sharp it projects the shape of the square LED chip itself. I don’t know if that’s considered a good or bad among flashlight aficionados (and there is such a thing as a flashlight connoiseur, believe it or not), but that little projected square is really, really bright.

The most unique feature, in my opinion, is the mini-lantern built into the flashlight. The TC-80 has a telescoping base that, when extended, reveals a second light consisting of a COB (Chip-On-Board) strip light designed to serve as a tiny lantern. The power switch toggles between three modes: the front beam, the mini-lantern and a third light- a flashing red light that eminates from the COB! This is something that could come in quite handy and could even be a life saver if one is stuck on the side of a highway at night.
The TC-80 has one more nice touch. The base of the flashlight includes and embedded magnet, which is powerful enough to firmly support the flashlight when attached to a metal surface such as the side of a vehicle when changing a tire. Think of the possibilities! I know I can.
According to the product description, the TC-80 is made with aircraft-grade anodized aluminum, and is advertised as shock proof and water resistant. Now, keep in mind that water resistant does not mean waterproof. There is a difference, and it’s an important one. It may be able to take some moisture, and even some rain, but don’t drop it in a lake. I haven’t tested it in the rain yet, so I don’t know just how much moisture it can take, but it looks and feels fairly rugged, so it can probably survive at least a light sprinkle.
To summarize, the AYL TC-80 is a well designed and solidly constructed flashlight that can be quite useful for a number of applications when emergency light is needed. I personally think everyone should have a TC-80 or something like it in their vehicle or at their bedside, just in case. It retails for around $50 but you can pick it up on Amazon for about half that. This is not a cheapo plastic D-cell flashlight from Wal-Mart. The TC-80 ranks closer to a pro model. There are high end, professional grade flashlights out there that cost $100 or more, and while this isn’t the top-of-the-line as flashlights go, The AYL TC80 is well worth the retail price, in my opinion. At half that, I think it’s a bargain.
I received a free AYL TC-80 4-in-1 LED Flashlight in exchange for my honest review. The review, comments and opinions are my own.

It’s no secret that jumping rope is a real workout, and knowing this, I began to shop around for one to supplement my daily walks. I first purchased a really inexpensive jump rope with a plastic cord, but was very unimpressed with it. So when I was offered an opportunity to try a Roxow jump rope free in exchange for my honest review, I jumped at the chance, metaphorically speaking, that is.
I ordered the light blue Roxow jump rope through Amazon using a coupon code the company sent me to negate the cost. Since I am an Amazon Prime member I was eligible for free two day shipping and received it within a couple of days. It’s a good thing, too, because I only had a couple of weeks to try it out before I had to publish this review.
When I opened the box, my first impression was mixed. It was smaller and much lighter than I expected. The handles were small and made of plastic. The cord was really, really thin, and when I first tried it, it was so thin it caught under the heels of my shoes and I nearly tripped trying to get started. After a couple of false starts with that, however, I was up and jumping, and I was impressed with how easy it was and much control I had with the rope. Well, I wouldn’t really call it a rope, since it isn’t actually made of rope. It’s a really a thin, metal cable covered with plastic. The quality is good and so far it’s held together during my workouts, and that works for me.
The product includes the Roxow Jump rope in your choice of light blue, red or black, a spare rope (cord), spare hardware for connecting the rope to the handles, a carrying case, a workout ebook and video. Actually, the last two items are not in the box, they are virtual, presumably downloadable. To clarify, the product includes a one-sheet with the promise of “special bonuses”, including a workut ebook, workout tutorial video, 25% off future purchases, some sort of VIP customer status and a lifetime warranty for the jump rope.
The spare cord, hardware and carry bag are a real plus. The bag is a nice touch and makes it easy to transport and store the rope.
Unfortunately, the ebook, video and other add-ons weren’t much of a plus at all. In fact, I was not able to redeem them. Roxow included this flyer in the package heavily promoting Special Bonuses with a QR code and link to a landing page to redeem them after registering the jump rope on their site. The problem was, there was no button or link anywhere on the site for product registration, so I was unable to register the Roxow product. The URL listed on the flyer did take me to a landing page to get the bonuses, but when I entered my e-mail address and clicked the button to “send me these free gifts now!”, it returned with what was essentially a 404 page, with an “Oops, page not found! It seems that the page you are looking for does not exist.” error. Clicking on some of the other links on the site, including the blog, returned “nothing found” page errors as well. Either the Roxow site is new and still under development, or it was unfinished and abandoned. Neither scenario is a good sign.
So, I guess no workout ebook, video or other bonuses for me.
Also, I noticed several grammatical errors and typos in the marketing materials and at least one on the site, which gave me the impression English is not the first language of the company. Grammatical and spelling errors are not good for company branding and can ruin an otherwise good marketing campaign.
In summary, I like the product and I think it’s well made. However, considering the ebook and video were supposed to be part of the package, the product was not complete. I think Roxow needs to either keep the promises they make about bonuses or just don’t make promises they can’t keep.
I received a light blue Roxow Jump Rope free in exchange for my honest review. This review and opinions are my own.
To make a good video, you need good editing software. Though sometimes that software may cost you a pretty penny, so there are times where you will want to opt for some free versions. Windows Live Movie Maker happens to be one of those free versions of video editing software. Is it worth downloading?
Keep in mind that Windows Live Movie Maker is an editing software ONLY. It cannot record footage off of your computer. First, use different software to record the footage, then either send it directly to Movie Maker or save the file and open it up in Movie Maker. You can also load in static images, and you can change the time in which the image stays up.
Once you’ve loaded in any necessary videos or images, editing them is pretty simple. And I mean simple. Tools-wise, you get the bare minimum needed to adjust the length of your video, add music, and add credits. You won’t be doing any fancy editing with this program.
Here is a screenshot of me editing an episode of my Youtube channel, Antio Plays.

As you can see from this screenshot, Windows Live Movie Maker supplies you with five tabs: Home, Animations, Visual Effects, Project, and View.

The Home tab is where the meat of the editing will be done. I lets you cut/copy/paste parts of the video, and you can add music and images from your documents folder from here, too. They work as expected, except my only gripe with adding pictures is where they’re added. Say I’ve got a long video, and I want to add an image to the beginning. When I open up an image to add it, the image gets dropped right smack at the end of the video, and it won’t let me cut/paste it to the top. I have to manually click and drag that sucker to the very top of my video as the screen scrolls up very, very slowly. It’s hard to explain, but to put it simply, it’s a pain putting images in the front of your video. I found that a way around this is to cut a sliver from your video, click on that section, and add the image there. Then you can easily click and drag the image over to the top, no hassle. Yes, it isn’t the end of the world that I have to do this, but it is pretty annoying.
The last thing on the Home tab is Theme, which to be honest I didn’t really mess around with that much. They let you put an opening title or credit to the beginning of your video in a fancy way. I didn’t feel a need to use them because of the next tab – Animations.
If you’re making a video with multiple segments, then you’ll want to put some transitions in them. This is what Animations is for. You can choose a wipe, fade, or open, among others. To place it, all you have to do is click on the segment you want, and choose the desired transition. Pretty simple. You can also change the duration of the animation if you wish.
The next tab is a bit similar, Visual Effects. Unlike Animations, this tab lets you choose a filter to last throughout the entire segment. You can make your video black and white, fuzzy, fade out, etc. It works the same as with Animations. Click on the segment and choose the filter. The filters provided are really simple, but it isn’t too bad for free software.
The next two tabs are Project and View. Project lets you line up the music with the video, of fit the screen to your liking. View is pretty self-explanatory. It lets you zoom in or out of your video.
The last part of the toolbar is the Edit tab. There are separate Edit tabs for music, video, and text (captions), depending on which one is selected at the moment. Fundamentally, they are all the same. It lets you choose the speed of which the media fades in or out, or lets you decide the volume of the video/music. You can change the duration of the selected media and at what part of the video it starts. For video and music, this is where the trim/split tool is located for simple edits. Caption edit allows you to also choose how the text enters the screen. You can also change the font, color, and duration of the text, as expected. All of these features are simple and easy to use, and they are very accessible to someone who is inexperienced with video editing software. My only complaint is that you can’t stack captions, such as putting on a caption, and keeping that one up while adding another one on the screen. Mover Maker only allows you to put up one caption at a time, which I found disappointing.
Once you have finished editing your video, you can head over to the File tab to save it, post it directly to social media, or render it for high-definition display. Rendering the video will vary in time, depending on the length of it. I’ve found that 20-30 minute videos will take between half an hour to a full hour to render.
In summary, Windows Live Movie Maker is a very simplistic, yet useful free video editing software. It is best used as an introductory to video editing. The tools given are the bare minimum needed to make a video, but as a result aren’t too hard to grasp. Using it over time, you will learn what certain edits do and can develop your own editing style to use in more advanced software. I don’t use Windows Live Movie Maker anymore, but I can say that when I did, it showed me what the fundamentals to making a video are so I could learn more complicated techniques down the line. If you’re itching to make flashy videos, Windows Live Movie Maker will disappoint you. If you just want a free way to edit videos on the fly, then you’ll find that Movie Maker does the job.
Windows Live Movie Maker is part of Windows Essentials 2012, which includes Windows Live Mail, Movie Maker, Photo Gallery, Messenger, Writer, and OneDrive.